1.17.2022

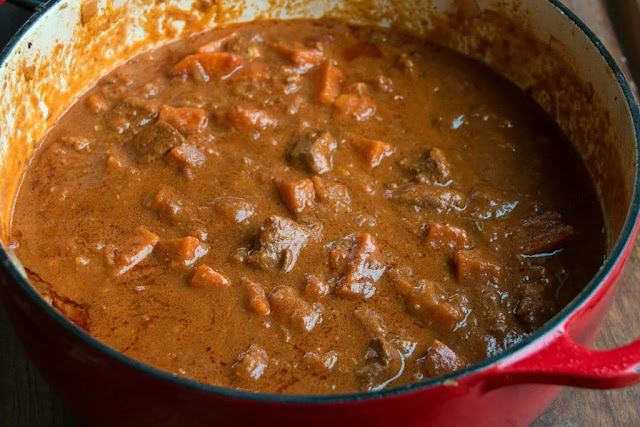
Senegalese Peanut Stew

Creamy and delicious peanut soup is very commonly eaten across West Africa with starchy food. It is easy to prepare with store cupboard staples and is very versatile.

Peanut soup is traditionally prepared with ground peanut, but this recipe uses peanut butter for convenience.


    • 2 lbs (1kg) chuck beef (see notes)
    • 1/2 cup peanut butter (see notes)
    • 1 red bell pepper
    • 2 carrots, cut on the size of the beef
    • 2 tbsp tomato paste or 3 fresh chopped tomatoes
    • 1 onion
    • 1 tbsp bouillon powder
    • 1 tsp cayenne pepper
    • 1/4 cup any vegetable oil (see notes)
    • 1 tsp salt to taste
    • 1 tsp black pepper
    • 1 cup water
    • 2 cups stock/broth

    Instructions

    • Cut the beef into small pieces.

    • Pour oil into a pan on medium heat.

    • Add beef, 1/2 tsp of black pepper, and a pinch of salt, and saute for 8-10 minutes.

    • Chop the onions and bell pepper.

    • Add onions and red bell pepper and saute for 3 minutes.

    • Add tomato paste and stir.

    • Cook for about 5 minutes.

    • Add water, stock, and bouillon, cayenne pepper and salt to taste.

    • Combine carrots and bring to a boil and cook for 15 more minutes.

    • Add peanut butter and stir till it is dissolved.

    • Let it cook till it thickens, roughly 2-5 minutes.

    • Serve with rice and enjoy!

    Notes

    This recipe serves 6 and contains 6 net carbs per serving.

    - You can substitute the beef for lamb, chicken or goat.

    - You can substitute the vegetable oil for coconut or palm tree oil. 

    - Usually in africa it is made with crunched peanuts. Using a food processor mix 1/2 cup of peanuts if you would like a more authenthic peanut stew.

  • - You can adjust the cayenne pepper to your desired preference. To increase the heat, add a whole habanero pepper after adding the stock.

  • - After adding the peanut butter, you can add a little water if the stew is too thickIf you use beef for your peanut stew, cut it into smaller pieces before sautéing, to cut down on your cooking time.

1.14.2022

Pao de queijo (Brazilian cheese bread)

Ingredients for 12 cheese balls:

-1 1/3 cups (170g) Tapioca flour or starch (See notes) -2/3 cup (160ml) Milk -1/3 cup (80ml) Oil -1 Egg, large -1/2 teaspoon Salt -2/3 cup (85g) Grated mozzarella cheese or any other cheese (see notes) -1/4 cup (25g) Parmesan cheese, grated Directions: 1. Preheat oven to 400°F (200°C). 2. In a large bowl place tapioca flour/starch. Set aside. 3. In a large pan place milk, oil and salt. Bring to a boil. Pour into the tapioca and stir until combined. Add egg and stir until combined. add cheeses and stir until incorporated and a sticky dough forms. Add one exra tbsp tapica flour if necessary. 4. Shape the dough into balls and place on a baking tray lined with parchment paper. Bake for 15-20 minutes, until lightly golden and puffed. 5. Eat warm or let cool. Notes: - This is a gluten free bread. - Which cheese to use for the Brazilian cheese bread: you can use mozzarella, cheddar cheese, gruyere cheese, combination of serval cheese or any cheese that you like. - Whats the diffecence between the tapioca starch and tapioca flour? In short, there is no difference between tapioca flour and tapioca starch. The name on packaging depends on the producers' choices. - You can store Pão De Queijo at room temperature up to 3 days. But they taste the best fresh. - To freeze them, shape into balls, place on the baking try and bring to the freezer. Once they are frozen, transfer to a ziplock bag and keep them in the freezer up to 3 months.


1.13.2022

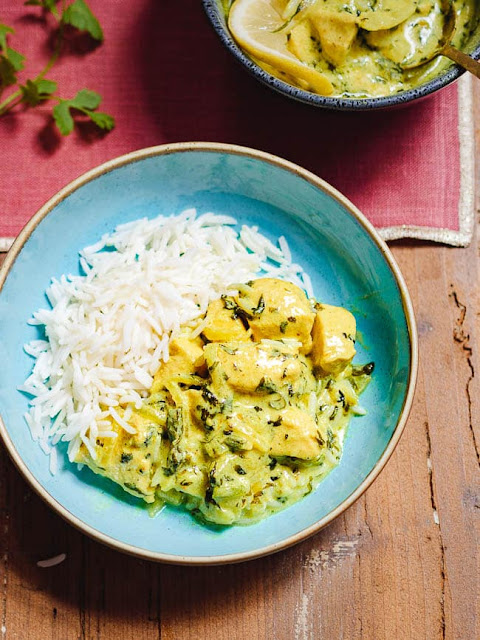
Afghan Chicken (Lawang)


Very mild and flavourful yoghurt based curry. 

This recipe serves six

- 1 1/2 
cups full-fat Greek yogurt
- 3 pounds skinless, bone-in chicken legs and/or thighs
- 2 green chilies (remove the seeds if you like), finely chopped, or any other chili to taste
- 5 tablespoons butter or ghee (Clarified butter)
- 2 medium yellow onions, finely chopped
- 4 cloves garlic, minced
- 1 tbsp ginger, finely chopped
- 1 1/2 teaspoons salt
- 1/2 teaspoon ground black pepper
- 1 tablespoon ground turmeric
- 1 1/2 teaspoons ground coriander
- 1 cup roughly chopped fresh cilantro
- 3 lemons
- Steamed basmati rice for serving.


1. Remove the yogurt from the refrigerator while you prepare the chicken.

2. Heat 2 tablespoons of the butter over medium-high heat in a large, heavy-bottomed pot with a lid. Add the onions and ginger and saute until soft and nicely browned, about 10 minutes. Add the garlic and saute another minute or so.

3. Add the remaining 3 tablespoons of butter to the onions. Add the chicken and sprinkle the salt over everything. Stir well and drop the heat to low. Cover with a lid and simmer for 25 minutes, stirring occasionally to keep the chicken from sticking. Add the black pepper, turmeric and coriander, and stir. Cover and continue to cook on low until the chicken is very tender, another 25 minutes. If the pan begins to go dry during cooking, add water, a couple of tablespoons at a time, as needed.

4. Remove the pan from the heat and let it rest for 10 minutes.

5. To add the yogurt to the chicken, do as follows.

6. Spoon about 1/2 cup of the onion mixture/sauce from the chicken into a small bowl. Spoon half the yogurt into the bowl and stir. Add the remaining yogurt and stir again. Then, add the yogurt mixture to the chicken and slowly stir it until it looks like a uniform, creamy sauce. This process will help prevent the yogurt from separating when added to the chicken. If it does separate after all, not to worry, it will still be delicious (just not quite as pretty).

7.Stir in the chopped cilantro and serve with steamed basmati rice with lemon juice on the top.

Alfajores (Argentinian cookies recipe)

These cookies are so soft, that they will melt in your mouth! I learned to make these when I was just 19 while living in beautiful and friendly Buenos Aires. They are easy to make and usually served with a nice cup of coffee or mate tea and with a company. 


Recipe for the Alfajores (Argentinian cookies recipe)

-2 sticks (230g) butter – soft

- 1¼ (150g) powdered sugar

- 1 3/4 cups (245g) all-purpose flour

- 2 cups (240g) cornstarch

- 2 tsp baking powder

- 5 egg yolks

- 1 tsp vanilla extract

- 10.6oz (300g) dolce de leche

- 1/4 cup desiccated coconut (optional)


1. Place flour, cornstarch and baking powder in a bowl. Whisk and set aside.

2.  In a mixing bowl beat butter and powdered sugar until fluffy. Add egg yolks, one at the time, add vanilla extract, beat until incorporated. Gradually add the flour mixture and beat until smooth dough is formed. shape the dough into a smooth disk, Wrap it and Place in the refrigerator for a minimum of 1 hour.

3. Line two baking trays with baking parchment, set aside.

4. Roll out the dough on a lightly floured surface to 1/4-inch (1/2cm) thickness. Cut out the alfajores with a 2-inch (5cm) round or fluted cutter. Reroll leftover dough and cut more alfajores.

5. Place the alfajores on the baking sheets and Put back in the fridge for 30 min.

6. Preheat oven to 350F (180C)

7. Bake 1 sheet at a time for 8-9 min, the cookies should stay pale on top. cool completely.

8. With a pastry bag or a spoon spread dolce de leche over one alfajor, gently close and make sandwich. For decoration roll the cookies in desiccated coconut or dust with powdered sugar.

1.12.2022

Easy Brazilian chicken pie


For the dough:


4 eggs
2 cups milk
1/2 cup parmesan or any hard cheese, grated
1 cup olive oil or canola oil
1 tea spoon salt
3 cups flour
1 tbsp oregano
1 tbsp baking powder

Mix all these ingredients using a blender or a mixer and reserve.

For the filing:

1 cooked and pulled chicken breast or other parts of the chicken
3 cloves garlic, chopped
1 onion, chopped
1 1/2 cup of sweet corn
3 tomatoes, chopped
1 cup olives, chopped
 Fresh cilantro
1 lime
1 cup of cream cheese
Olive oil
Salt & Pepper

Start frying the garlic and onion together. Add the chicken, then the tomatoes and corn and let cook for five minutes. Add olives and squeeze the lime on the mixture. Let cook for one minute. Turn off the heat and combine the fresh cilantro and cream cheese. Salt & pepper to taste. You can also make it spicy.


Making the pie:

Pour a half of the dough mixture in a baking tray. Then put all the filling on top and pour the other part of the dough on top of the chicken. Bake for about 40 minutes.


1.04.2022

Fresh Pasta

Pasta dough (Traditional)

Pasta Shapes

Pear Ravioli served with Parma ham and Prosecco sauce

Beets Pasta dough

Beet Ravioli stuffed with Goat cheese and mint

Beet Ravioli (Casunziei)

Buckwheat pasta

Carrot pasta dough

Chitarra Pasta

Garganelli

Squid Ink Pasta

Spicy pasta dough

Spinach Pasta dough

Pumpkin Fagotini 

Wholemeal Pasta

Beet Ravioli stuffed with minty goat cheese and lemon sauce


  • For the beet ravioli and filling
  • 2 large beets
    1/2 teaspoons olive oil
    2 eggs
    1/4 cups flour (plus more for dusting)
    1 teaspoon salt
    1 cup ricotta cheese
    3/4 cup goat cheese
    1 tablespoon chopped parsley
    1 tablespoon chopped mint
    1/4 teaspoon salt
    1/2 teaspoon black pepper
    1/4 cup grated parmesan cheese, plus more for serving
  • For the brown butter sauce
    8 tablespoons butter
    1/2 tablespoons lemon juice
    zest of one lemon
    10 chopped mint leaves

  • Preheat oven to 400° F.
  • 1. Wrap the beets in tinfoil and place on a baking sheet. Roast about 1 hour or until the beets are tender.
  • 2. Remove beets from oven and allow them to cool a bit before handling. Remove the skins, place in a food processor and puree the beets until smooth.
  • 3. Add eggs to the food processor and pulse until combined. Add flour and salt and process until dough comes together.
  • 4. Transfer the dough to a well-floured surface an knead until smooth about 7 to 10 minutes (add in more flour if the dough is sticky)
  • 5. Cover and let rest for 2 hours.
  • 6. Before dough is done resting make the filling by combining chopped parsley, mint, ricotta, goat cheese, and salt and pepper in a mixing bowl. Set aside.
  • 7. When dough is done resting, cut into 4 pieces. Roll out each piece to form a thin layer (about 1/8") of dough.
  • 8. Place 1/2 Tablespoon of filling onto one sheet of the dough about 1/2" from the edge. Continue to place spoonfuls of filling along the dough about 1" from each other.
  • 9. Place one of the other pieces of rolled out dough on top of the piece with the filling on it. Pinch the dough around the filling to form the ravioli.
  • 10. Use a sharp knife to cut out the ravioli into individual squares.
  • 11. Pinch the edges of each ravioli with the edge of a fork. Set aside each ravioli in a single layer on a baking sheet dusted with flour until ready to cook.
  • 12. Add ravioli to a pot of boiling water. Stir until the water returns to a boil. When the ravioli float on their own, about 5-7 minutes, they are finished.
  • 13. Serve on individual plates drizzled with brown butter sauce (below) and shaved Parmesan cheese.
    1. For the brown butter sauce
    2. 1. Melt butter in a pan. Cook over medium heat until the butter is completely
      melted and brown bits start to form.
    3. 2. Add lemon juice, zest and mint, remove from heat.


1.02.2022

The Hobbit Seed Cake

  • 1 cup butter, softened
  • 1 cup extra fine sugar
  • 4 large eggs
  • 1 1/3 cup self-rising flour, sifted
  • 4-6 tbsp milk
  • 2 tbsp brown sugar
  • 4 tsp caraway seeds
  • 3 tbsp brandy
  • 1/2 tsp ground mace
  • 1/2 tsp fresh ground nutmeg

  • Pre-heat the oven to 350F
  • Beat the eggs in a medium-sized bowl
  • In another larger bowl cream the butter and sugar together until the mixture is pale and fluffy
  • Gradually whisk in the beaten eggs a little at a time
  • When all the egg, sugar, and butter has been mixed, stir in the caraway seeds, ground mace and fresh ground nutmeg
  • Lightly fold in the flour
  • Add the brandy, stirring it in
  • Add just enough milk to loosen the mixture and give the cake batter a good ‘dropping’ consistency
  • Pour into cake pans and bake for 30-40 minutes, or until a metal skewer comes out clean
  • Cool in the pan for 10 minutes, then turn out onto a wire rack to cool further.

Gnocchi

Gnocchi dough

Gnocchi alla Sorrentina

Gnocchi alla Bolognese

Gnocchi with four cheeses sauce

Gnocchi with cheese and almonds sauce


Gnocchi alla Vodka

Chestnut gnocchi

1.01.2022

Difference between arborio and carnaroli rice

 The most crucial properties of a good risotto rice are high starch content and the ability to absorb liquid. Arborio rice has long been a traditional favorite and probably the best known rice for risotto-making. However, there are actually a number of superfino-grade Italian rices with the high starch content that gives risotto its characteristic creaminess. All these varieties have short, plump grains that are not only suitable for risotto, but which are arguably superior to Arborio.
In stirred rice dishes, such as risotto, some of the starch is released, and it is this extra starch that creates the smooth, creamy texture. The trick is to use a rice that will absorb the liquid added to it without breaking apart or sticking together, thus retaining its consistency.Carnaroli rice is an Italian variety that has short, plump grains like those of Arborio rice. Also, like Arborio rice, Carnaroli grains are high in starch content and, when cooked, have a creamy, saucelike consistency.Trendy Italians, always on the lookout for the latest culinary craze, currently prefer Carnaroli because of its firm grain.Vialone Nano is another favorite of this type. It has a medium grain, shorter and thicker than arborio, and is nearly impossible to overcook. Able to absorb more than twice its weight in liquid, Vialone Nano is perfect for creating a very hearty risotto. It also pairs nicely with fish, and is wonderful for making rice pudding.Me personally if I had just one rice to choose, it will be the Carnaroli…


CARNAROLI RICE: RISOTTO, HISTORY, ARBORIO VS CARNAROLI

Carnaroli rice is an Italian rice variety particularly known as suitable for the preparation of risotto, a typical Italian dish. Many people consider Carnaroli risotto the best risotto.
Ettore De Vecchi, a rice farmer, aimed to obtain a rice variety that was not too high (lower than that of Vialone), resistant to lodging and with good cooking resistance. To obtain the new variety, the work of a geneticist who worked with prof. Emiliano Carnaroli at the University of Milan and the work of prof. Carnaroli himself were of primary importance. But when was Carnaroli rice born? And where? Can we say more about the invention? And what are its propertiescooking timecalories and some recipes?  Can we use Carnaroli rice only for the risotto recipe? And is it better than Arborio to cook risotto? Let’s see!

HISTORY OF CARNAROLI: BIRTH, NAME, CONSERVATION OF THE VARIETY

When was Carnaroli rice born? How did it happen that it was given the name Carnaroli?
And who is responsible for its conservation?

The birth of Carnaroli rice
In 1945 Ettore De Vecchi, a rice grower, presented a new variety of rice: the Carnaroli.
Carnaroli rice was born in the rice fields around Paullo, near Milan.


Ettore De Vecchi worked for many years to obtain the new variety of rice, making crossings
in his fields of the 
Casello farm in Paullo.


The new variety was the result of the work not only of Ettore De Vecchi, but also of 
a breeder geneticist and of prof. Emiliano Carnaroli, with whom the geneticist
worked at the University of Milan.
Emiliano Carnaroli was a university professor of agricultural hydraulics; he collaborated
in numerous reclamation projects in Italy and was president of the Ente Nazionale Risi
(National Rice Authority). Perhaps he also personally helped financially the hybridizing
geneticist, who was working on the experiments and whom he considered very promising.
The new rice was born from the crossing of two varieties: the Vialone Nero – which had
 been discovered by grandfather Achille De Vecchi in 1903, when he resided in Vialone –
 and Lencino.

The name

Regarding the attribution of the name ‘Carnaroli’ to the new variety of rice, we found a
video, an interview with Mr. 
Achille De Vecchi. In the video, Mr. Achille De Vecchi says
that the water manager, whose surname was Carnaroli, every year used to see the
commitment of Ettore De Vecchi and the fact that he did not arrive at the desired result.
For this reason, he said: ‘Dutur, se fèm?’, that translates to ‘Doctor, what do we do?’
(here the term ‘doctor’ is not intended as title for a person holding a doctor’s degree
in medicine, but generically as a title for person who has graduated).
Ettore De Vecchi told him to be patient, and that if he could obtain the variety he had
in mind he would give it his name.


The patent and the conservation of the Carnaroli rice
variety

With the death of Ettore De Vecchi the patent of the Carnaroli variety passed to his cousin
Achille De Vecchi, born in Milan in 1939.
Later, the De Vecchi family abandoned the production of rice, and Achille De Vecchi in 1983
gave the plant material in his possession to the 
Ente Nazionale Risi, so that the latter
continued in conservative selection.
Since then, the Ente Nazionale Risi is the conservator of Carnaroli rice in purity.


Desserts

Amaretto and chocolate mousse

Amaretto Cheese cake


Alfajores Argentinos (Argentinian cookies recipe)

Apple cake

Bailey's Semifreddo

Brioche (Italian pastry for breakfast)

Blintz (Jewish Pancakes)

Cannoli

Cantucci - Italian Biscotti

Chocolate Salami

Coffee Liquor


Creme Brulee

Creme Brulee with Dulce de leche

Crepes

Easy Frittelle 

Limoncello Sorbet

Nutella Cookies

Ricotta pie with crust

Sebadas or Seada

Strawberry Jam

Strawberry Tiramisu


South Tyrolean Apple Strudel

Tiramisu (Classic)

Tiramisu with pumpkin

Tiramisu alla Nutella

The Hobbit Seed cake

Panna cotta

Panna cotta al pistacchio


Poached pear with red wine

Polenta cake

Pumpkin Cappuccino

Tarte Tatin


Pappardelle with chorizo, shrimp and mussels

1lbs (500g) pappardelle

4 tablespoons Olive oil
½ pound Spanish Chorizo, sliced 
1lbs (500g) mussels, cleaned & scrubbed 
1lbs (500g) shrimp, shell on 
4 garlic cloves, minced
½ medium onion 
1 tablespoon minced fresh basil leaves 
1 cup tomato pure
1 tablespoon lemon zest
1 cup dry white wine 
Juice of ½ a lemon 
2 tablespoons minced fresh flat-leaf parsley 
Sea salt & freshly cracked black pepper 

1. Bring a large stockpot of salted water to a rapid boil. Cook your Pappardelle according to the package directions (al dente, please), drain, reserving 1 cup of the pasta cooking liquid. Set aside. 

2. Meanwhile, heat a large high-sided skillet over medium-heat, and combine the olive oil. When the oil is shimmering, add the chorizo and cook, turning often, until golden, browned all over, and cooked through. Remove with a slotted spoon, leaving the excess oil in the pan. 

3. Add the onion, season with a pinch of salt, and cook, stirring, until softened and translucent, about 4 – 5 minutes. Add the garlic and cook for 30 seconds, keeping a close watch that it doesn’t burn. Stir in the tomato pure and basil, and cook for 1 minute. Add the shrimp, season with sea salt, and cook for 1 minute on 1 side. Toss, pour in the white wine to deglaze, then bring to a simmer and add the lemon zest, reserved pasta water, and mussels.

4. Cover and cook until the mussels are fully opened, about 5 minutes (discard any mussels that do not open). Grab a spoon & season with sea salt and cracked black pepper to taste. Squeeze in the lemon juice, add the cooked chorizo, and then toss through with your cooked pappardelle. 

5. Transfer to a serving platter, and top with parsley and an extra hit of freshly cracked black pepper. Delicious!